Friday, December 10, 2010

New Baby

Sorry I haven't posted in a while.  I've been away because I had a baby.  My due date was November 18th, but the baby didn't arrive until November 28th.  During those 10 days I was occupied with getting some last minute things done around the house and finishing my Christmas cards.  I actually finished my cards the same day that my water broke.  Anyways, since the baby arrived, I've been busy being a new mom.  I did have a few cards made prior to the arrival, so I will share them with you.

For those of you that might be wondering, I had a baby boy.  His name is Caius Alexander and he was 7 lbs, 4 oz.  And he's a sweetie.


In honor of the new arrival, I have a couple baby cards.

This is a pocket card that I made as a baby announcement card.  I will be slipping a picture of the little man with his birth informaiton into the pocket.  I made these prior to his arrival, so I picked gender neutral colors. 

This is a super simple and sweet card that's perfect as a Congratulations card.

This card uses the same layout as the previous card, but I tweaked it a little.  I added more layers and a tag.  
I used the Soft Subtle DSP for all three cards and I also used cardstock from the Soft Subtle family.

I used the following stamp sets:
                 Teddy and Trains
                 Animal Stories
                 Introducing  (retired)

These stamps are perfect for all baby related projects.  I will be using them when I make a scrapbook of my baby.


Take care and Merry Christmas

Kristy

Thursday, November 18, 2010

A Cute Gift

I love candles.  I love stamping on them.  They make a perfect gift.  Over the last few years, I have made several candles and given them away.  
This year I made a Christmas candle and a matching card.  Its so pretty I think I might keep it for myself.  But you never know.

 I used the Home for Christmas stamp set for this candle.  I love the image of the door with the wreath and its perfect for watercoloring.  I stamped the image on white tissue paper and coloured it.  I then melted into the candle with my heat tool.  I added a little ribbon and a tag and Voila!!

So what do you think?  Would you love to receive this for Christmas?
Here is the matching card.  I used the same stamp set and coloured it the same way.  However, I made a side step card.  I found the directions for this card from fellow Stampin' Up demonstrator, Julie Davidson.  You can visit her blog for the instructions and template.

The card looks fabulous but is easy to do.  
I left the space on the right blank, so that I can write a personal message to the recipient.  

I enjoyed making this card, and plan to make many more.

Now all I need to finish this gift off is some gift wrap.  I think I will make a matching gift bag.  

Thats all for today.  

Enjoy

Kristy

Tuesday, November 16, 2010

First Trade Fair

Spruce City Skate Club asked me if I would have a table at their Christmas Shopping Night.  The event was a fundraiser for the club and I agreed to participate.  As this was my first trade fair, I was a little nervous on how it would turn out.  However, it went well.

Here are some photos of the table.
I only had one table, so I didn't have a lot of room.
I put out several samples of cards, several catalogues, and a door prize.

 Here is the door prize.  The basket consisted of a border punch, a stamp set and the supplies needed to make 10 cards.  I also included a catalogue, ink spot, and "Hand Stamped by" stamp.

The winner of this basket was so excited.  This was the prize she wanted to win.  And it happened to be her birthday when I phoned her. 


Here I am 8.5 months pregnant. The apron does a good job hiding the belly from the front, but not from the side.


I think the evening was a success.  I made a few contacts and I look forward to see these ladies at classes in the future.  Of course, I'm not doing any classes as I wait for the baby to arrive.  But in the new year, I do plan on having a class once a month.

Enjoy your day


Kristy

Monday, November 15, 2010

An AMAZING Deal

Stampin' Up!  has come up with an amazing offer on the starter kit.  
It's 50% off!!!!!
If you have ever considered joining, now is the time.  You get the full starter kit or Digital + Starter kit for only $107.50 (reg. $215).  There's over $375 worth of products in the kit.  If you're new to stamping and don't have a lot of the basics, this is an excellent deal.  You can purchase the starter kit and choose not to be a demo and there is no penalty.  That's how I starter out years ago.  

If you would like to take advantage of this great deal, visit my website  (click on Join Now).  You'll need my recruit password which is M@uve07.  I would love to have you join my team.

Have a wonderful day

Kristy

Thursday, November 4, 2010

Let it Snow Part 4

I have the final card in the Let it Snow Series.  I hope you have enjoyed all the cards that I have created.  
Christmas is my favorite time of year for making cards.  I come up with so many ideas, but I don't always have to time to make and share them all.  

Here's another simple card.  I really enjoy simple cards at Christmas, because I make so many.  But simple doesn't have to mean bland.  I used pastels to color the tree, which adds a soft glow (which you can't see in the picture).  The satin ribbon and taffeta ribbon adds some elegance.  The Cherry Cobbler makes the image pop.
All of these cards will be available at my booth at the Spruce City Skate Club fundraiser.  The event is this Friday from 7 -9 pm at Heather Park Elementary.  

Enjoy

Kristy

Let it Snow Part 3

Here is the third card of my Let it Snow series.

This card is really simple to make.  However, it does take a bit of time.  I made a stencil using the Ornament punch and sponged two ornaments on Very Vanilla.  The bulb portion of the ornament is sponged in a different color from the cap portion.  I also stamped an ornament image from Delightful Decorations and punched it out.  Again, I used a piece of dsp from Jolly Holiday DP and paired it with Old Olive and Crumb Cake.

Such a simple card, but fun to make.  

Later, I will have the final part to the Let it Snow series.

Enjoy,

Kristy

Tuesday, November 2, 2010

Let it Snow Part 2

Here is the second project in the Let it Snow series. 


This card features the Emboss Resist technique.  I love how using Emboss Resist makes an image pop.  I stamped the tree image from Paisley Prints with VersaMark and then embossed with Clear embossing powder.  Once it cooled, I sponged Old Olive Classic Stampin' ink all over the paper.  Then I wiped the ink off the embossed image.  
Again, I used a piece of dsp from Jolly Holiday.  
The colors used are Cherry Cobbler, Old Olive, and Very Vanilla, which are in the Jolly Holiday dsp.
I added a gold brad to the tree top for some bling and some Very Vanilla grosgrain ribbon for elegance.

I hope I have inspired you.

Have a great day

Kristy

Monday, November 1, 2010

Let it Snow Part 1

I know you don't want to hear someone singing "Let It Snow, Let it snow, let it snow" but it is that time of year.  And before its too late, you'll want to start preparing for Christmas.  This week I'm going to show you a couple of projects that I have put together for a business fair that I'm participating in this weekend.

I have made up 4 different cards to sell and I will be showcasing other cards as well.

Here is the first card:
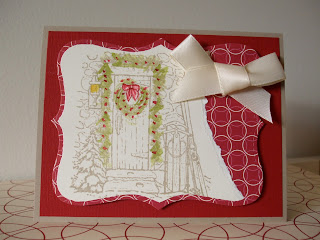
I wanted to feature the Big Shot.  I decided to use the Top Note die and layer it.  I used the Home For Christmas stamp set and colored it with Aqua Painters and classic ink.  This gives it the appearance of being water colored.  And a Very Vanilla Satin Ribbon tied in a bow finishes the card off.  


The color combination I used was Crumb Cake, Cherry Cobbler, and Very Vanilla.  This combination coordinates with the Christmas DSP from the Idea Book and Catalogue (I can't remember the name of the dsp).  

 I hope you like the card.

Tomorrow I will have another card for you.

Kristy

Sunday, October 31, 2010

Happy Halloween

As it is Halloween, I have a couple of Halloween projects to share.   I made these last year, but have never shared them with you.
I used the Batty for You stamp set for both cards.  I really love this stamp set.  Its fun and you can do so many different designs with it.  
I also used a crimper to add texture. 
 This card used some DSP from last years Halloween package. 

This is a 12" x12" scrapbook page.  I don't have any halloween pictures to put on it, but maybe next year.  

I hope y'all have a wonderful Halloween.


Kristy

Saturday, October 16, 2010

BLUE - Just Add Ink 39

I finally had the opportunity to participate in a challenge.  I'm so excited.  Its been ages and I'm really happy with how this one turned out.  Over at Just Add Ink, they issued a challenge to use the colour BLUE.  I went with a monochromatic scheme plus white for my cards.  I was able to make a set of four cards and card holder.  I used some retired DSP from a few years ago (yikes).  I seem to have a lot of retired DSP, which I'm in the process of using.  I also used a retired stamp set, Take Three.  Its one that I have only used a few times, as I never really found a good card for it.  This time the stamp set was the perfect choice.

Here are the pictures


Unfortunately the pictures aren't very good.  I haven't found the perfect spot for placing my projects for portraits.  Once my craft room is fully organized and clean (like that will ever happen), I'm hoping to have a shelf that I can display my projects.  
What you can't see in the picture, is that I used the same embossing folder (I can't remember which one and I don't have my catalogue on hand) on each card.  The colors are Baja Breeze  (so happy its back) and Not Quite Navy (glad they kept it).  I also used silver brads and Whisper White 1/4" grosgrain ribbon.  I used a few different punches as embellishments on the cards.  
The card holder is made out one sheet of dsp.  I used a scrap of dsp (from the same package) to decorate the front.  

I love make sets of cards that coordinate.  I'm hoping I can do the same for all my Christmas cards.

Happy Fall and take care,

Kristy

Wednesday, October 6, 2010

First Fabric Attempt

Stampin' Up! has released a fabric line this year in the Holiday Mini Catalogue.  I decided to try out the Deck the Halls fabric, which coordinates well with the Deck the Halls Designer paper and with Cherry Cobbler, Always Artichoke, and Crumb Cake colors. 

Here are two cards that I made using two of the fabrics.


I used the Top Note die to cut the fabric  (works really well) and then I used sticky strip to adhere it to the cardstock.  I also cut a small strip of fabric from one of the other patterns.  I used this to tie a knot. 
For the second card, I used the left over fabric from the first card. The second card is a reverse image of the first card. 

I think I did alright for a first attempt.  However, with the rest of the fabric, I'm going to attempt to make a pillow. 

Enjoy

Kristy

Saturday, September 25, 2010

Christmas Ornaments

A couple of years ago, I received a set of beautiful hand decorated ornaments for Christmas  (from my parents).  They were remarkable and add that extra something to my Christmas tree.  This year I decided I wanted to make these ornaments.  They are super easy to make and are wonderful to give.

Here they are:
I purchased clear Christmas bulbs from my local Michaels Craft store.  They have a variety of sizes and shapes.  They come in a nice case which makes wrapping them up as a gift easier.  
Here is what I used:
  • Night of Navy Classic Stampin' refill
  • Rose Red Classic Stampin' refill
  • Handsome Hunter Classic Stampin' refill
  • Gold Glitter from Martha Stewart Crafts
  • Silver Glitter from Martha Stewart Crafts
  • Rub on images
I found putting the rub-ons a challenging task.  I've  decided that rub-ons are meant for flat surfaces not curved, such as glass ornaments. 
The easy part was putting the ink in with the glitter.  All you do is add a few drops of ink to the inside of the ornament.  I also added a drop of water to help move the ink around.  I then covered the opening and shook the ornament until the ink was evenly distributed around the inside of the ornament.  I poured out the excess ink and then added the glitter.  Again, I shook the ornament around until the glitter was all over.  I also had to pour out the excess glitter.  Voila, your done.

Here are some close ups of the ornaments.

As you can see they sparkle in the light.

I do plan to make more of these before Christmas.

Enjoy the rest of your weekend.

Kristy

Thursday, September 23, 2010

Halloween One Sheet Wonder

Halloween is just over a month away and I decide to make some cards.  Of course I asked myself what I would do with Halloween cards, but that wasn't the important thing.  For these cards, I chose to use a One Sheet Wonder method.  I created 10 cards using one 8 1/2" x 11" piece of cardstock to make these cards. 

I used one stamp set (Batty for You), three different ink colors (Rich Razzleberry, Old Olive, and Cajun Craze) and two base cardstock colors (Basic Black and Rich Razzleberry).
I stamped the various images from the Batty for You stamp set all over the Whisper White card, thus creating my own patterned paper.  I then used a template that I found on Splitcoaststampers to cut up my new patterned paper. 

I then decorated 10 card bases with the patterned paper, extra cardstock, and greetings.

Here are some close ups of some of the cards.


One Sheet Wonders are a great way to create several different cards quickly.  You can create One Sheet Wonder templates for both 8 1/2" x 11" and 12" x 12" cardstock or you can visit different websites to find templates that others have created.

Have a great Halloween!!! 

Kristy

Saturday, August 21, 2010

Because I Care

One of the new hostess sets is called Because I Care and its a beautiful set.   It has an image of a hydrangea and two sentiments (Thank you and Because I Care).  The set is really versatile as you can make thank you cards, thinking of you cards, just because cards, birthday cards, and blank cards. 

The first card I made was a thank you card.
I wanted to try out the Smooch Spritz and the Presto Patterns Specialty Paper and this is what I came up with.  

It takes a bit getting used to the Smooch Spritz and getting the look you want.  I over sprayed a little too much in my practice runs and got lots of blobs of the gold ink  (not what I wanted). After some practice, I was able to get a more even spray.  The great thing about the Smooch Spritz is that you can spray has much or as little as you want, all depending on the effect you're looking for.  

The Presto Patterns Specialty paper is perfect for using the Smooch Spritz.  The paper is white with glossy white designs on it.  You need to use ink on it to highlight the images, and thats what the Smooch Spritz does.  

For this card, I chose the piece that had script background and used the Gold Glow Smooch Spritz to bring it out.  Its sets a for elegant background for the Hydrangea.

I wanted a classy look so I went with colors from the Neutral Collection, Early Espresso, Basic Black, and Very Vanilla.  To add a bit of a aged/distressed look, I crumpled the paper up.  With a little bit of Basic Black 1/4" Grosgrain ribbon, you have a simple but elegant card.  

I could have stamped any sentiment on this card, but I chose to go with a simple Thank You.

I must say, I really do like this stamp set.

As its a hostess level 1 set, you can only earn the stamp by hosting a workshop.  If you would like this stamp set, just give me a call to book your workshop.

Enjoy the end of summer.

Kristy

Monday, July 26, 2010

My Stampin' Up! Story

This month I was invited to join the Stampin' Up! Recruit Crew.  This is a training program to help demonstrators recruit and expand their business.  I'm hoping I will learn many things beyond recruiting and since my husband and I are expecting our first child this winter, I would like to expand my business so that I can stay home with our baby. 

Here is my Stampin' Up! story:


I've always been into crafts, ranging from paper crafts to needlework.  Then about 4 or 5 years ago my mother (my upline) introduced me to a new craft:  rubber stamping and card making.  At that time I was already into scrapbooking and thoroughly enjoyed it so it made sense to try rubber stamping.  At first I wasn't into the card making but it didn't take long for me to fall in love with it.  For awhile I borrowed my mothers supplies and then when I saved enough money, I purchased the starter kit.  It was ideal as I didn't have any of my own tools.  I was able to get all the things to start at a great low price.  At the time I was a student and chose not to do the business. 
I continued to purchase new stamps and supplies as I could afford and when my husband and I moved to a new town I decided to rejoin Stampin' Up! so that I could get a discount on anything I buy and to meet new people.  Through holding workshops I have the opportunity to meet new people and share my love of Card Making and Rubber Stamping.


I hope y'all enjoyed my little story.  I will be back to share with you some new projects using new products.  Have you checked out the new Idea Book & Catalogue?  If not, you can download it from the sidebar.

Enjoy the rest of you day.


Kristy

Tuesday, June 8, 2010

Manly Cards

June is a busy month of occasions for myself.  There's Father's Day, my husband's birthday, my father-in-law's birthday and my anniversary.  Needless to say, I have a need for masculine cards.   I've been working on a couple of ideas and here they are.  I will be featuring these two cards at my next workshop on June 15.  Visit my Stampin' Up! website for more details.


The first card features stamp sets from the 2009-2010 Idea Book.


The second card uses a stamp set and dp from the Summer Mini  (you can view this catalogue on the sidebar).
Let me know if you think these cards are manly enough for the men in your lives?

Catch y'all later.  

I hope to be posting more frequently now that I have my craft room set up again.

Kristy

Saturday, May 1, 2010

New Mini

Its May 1st and that means there is a new MINI!!!

There is some amazing things in this catalogue.  (You can view it on the sidebar.)
I've already purchased the Sentimental Journey thats perfect for men and women.  Its a fun stamp set that has a retro-vintagy style.  You'll have to check it out to see what I mean.
Also in the catalogue are some totally new products, such as Smooch Spritz.  This spray can add some shine to any image or paper.  

For all you scrapbookers, there are two new 6x6 albums.  One is in Bashful Blue with Only Orange pinstripes.  The other album is Old Olive with polka dots.  There are great and they are at a even greater price of $14.95.  

Give me a call if you want to see more of these great products and book your next workshop with me. You can earn a FREE Smootch Spritz.  

Have a great day with May Flowers.

Kristy

Tuesday, April 6, 2010

Sorry

Sorry....I know I haven't been around.  I've been busy moving into my first home.  Now I'm all moved but I still have to unpack.  It will be a little while before I post any projects that I'm working on. 

I'm hoping in the next week I will have my new stamp room set up and ready to go. 

Here is the list of events I'm hosting for the next couple of months.  If you are interested in attending any of the classes, fee free to email me.

April 19:  Gifts for Mom
        Learn how to stamp on a candle and make a beautiful coordinating card.

May 11:   Mini Album
        Create a mini album thats perfect for the coffee table or in your purse as a gift.

June 8:  Manly Cards
        Create two very masculine cards for the important men in your life.


For more information visit my website.


Have a wonderful day and enjoy the warm weather.


Kristy

Tuesday, March 16, 2010

Faux metal attempt...

Considering I'm suppose to be packing and cleaning, I sure seem to be making lots of cards.
Oh well.  The card I have made today is an anniversary card and it is also a submission to the challenge at Hand Stamped Sentiments.   Today's challenge is a technique challenge and the technique is faux metal.  I didn't follow the instructions provided.  I decided to tweek the technique.  I'm suppose to cover a piece of cardstock with gold or silver emboss power and heat it up.  While it is warm, I'm suppose to press an image into embossing powder.  Instead, I dry embossed a piece of Whisper White cardstock using the Big Shot.  I then applied silver emboss powder and heated it up.  This way the embossed imaged stood out.  It still looks like metal.  

Here is the card:
The faux metal isn't perfect.  You can still see white, but I think it adds to the card.  It gives it a rougher look.   For a little color I decided to add a So Saffron flower from Vintage Vogue.  

There you have it.  Definitely give it a try.  


Happy Stamping

Kristy


Supplies:
All products are Stampin' Up!® unless otherwise stated:
  • Whisper White cardstock
  • Basic Black cardstock
  • Not Quite Navy cardstock
  • So Saffron cardstock
  • So Saffron Classic Stampin' Pad
  • So Saffron 1/2" Striped Grosgrain ribbon
  • Vintage brads
  • Modern Label Punch
  • Vintage Vogue stamp set clear mount

Sunday, March 14, 2010

Think Green

Since St. Patrick's Day is coming up, all the challenges seem to be GREEN themed.  I found it very difficult trying to work with just greens and neutrals, but I managed.  I decided to use the Green Challenge from Stampin' Royalty, the sketch challenge from Stamping 411, and the inspiration challenge from Hand Stamped Sentiments to create this card.  The card is not necessarily for St. Patty's day but it is green and springy. 

The inspiration challenge had a beautiful picture of a summer patio.
Doesn't this picture inspire you to create a warm and beautiful card?
It sure inspired me.  I also think I might recreate this scene in my backyard.

Here is my card:

I know So Saffron isn't green, but its still related to St. Patty's day (think GOLD).  The Vintage Vogue stamp set really reminds me of warm weather and good friends, which St. Patty's day is all about  (maybe not warm weather, but warm atmosphere).  
What does St. Patty's day mean to you?

I'm off to make more warm cards, possibly Easter ones.  
Have a great day stamping.

Kristy


Supplies:
All Stampin' Up!® unless otherwise stated:
  • Old Olive cardstock
  • Vintage Vogue Stamp set
  • Very Vanilla cardstock
  • Chocolate Chip Classic Stampin' Pad
  • So Saffron  1/2" grosgrain ribbon (discontinued)
  • Bella Bleu DSP
  • So Saffron Classic Stampin' Pad
  • Old Olive Classic Stampin' Pad
  • DSP from 2009 SAB  (discontinued)
  • Hostess Set DP Level 3

Thursday, March 11, 2010

Crazy Color Combo

I was browsing through the different Color Challenges that I follow and I decided to try one out.  Diva Coffee Break Designs has a color combo that is a little crazy.  At least I would never have thought to put those four colors together.  At first glance, I didn't know how to put them together.  I decided to flip through some of their past sketch challenges and found one that I thought would be perfect for this color combo.  
Here is the Color Combo:
[color168+copy.jpg]
Can you understand my initial reaction?
Here is the sketch I used: 
[DCBD165.jpg] 
 I used a few more layers on my card so the colors wouldn't over power each other.

Here it is:
With this color combo I was worried the Bermuda Bay would too bright and overwhelming, but with just a hint, it works perfectly.  
I love the Vintage Vogue set  (118598  Clear mount).  I just got it in the other day, but I love it.  I'm after I've finished moving, I will be able to sit down and make a whole pile of cards using this set.  

Until next time, happy stamping.

Kristy


Supplies:

All Stampin' Up!® unless otherwise stated:
  • Soft Suede cardstock
  • Soft Suede Classic Stampin' Pad
  • Bermuda Bay Cardstock
  • Cameo Coral Cardstock
  • Cameo Coral Classic Stampin' Pad
  • Certainly Celery Classic Stampin' Pad
  • Very Vanilla Cardstock
  • Vintage Vogue clear mount

Wednesday, March 10, 2010

Petals and Flowers, Oh My

Right now I'm in the middle of packing my house in order to move.  One of the rooms that I packed up was my crafting room.  I didn't pack everything as I left out a few essentials so that I could continue stamping until I was completely moved.  I didn't think I would have time to sit down and do any major projects, but I was wrong.
Last night, I had a workshop in which we used the Petal Party Simply Scrappin' kit.  The idea was to make 2 6x6" scrapbook pages, but we made cards instead. As I only had two ladies attending, I had lot of supplies left over.  So this morning, I decided to make some cards.  I used just the cardstock, dsp, and self-adhesive die cuts, along with some ribbon.  
Here is what I came up with:

Thats 12 cards that are all unique.  I used the So Saffron and Pixie Pink cardstock, along with two sheets of the DSP.  With one Simply Scrappin' Kit you can make 32 cards or 8 12x12" pages, or 32 6x6" scrapbook pages.  I love these kits.

Here are some close up shots of the cards:


What can you make with just one kit?  I love to see what you come up with.

Have a great day stamping.

Kristy

Supplies:
All Stampin' Up! unless otherwise stated:

Petal Party Simply Scrappin'                       113059
Old Olive   1/4" Grosgrain Ribbon             111368
So Saffron  1/2" Striped grosgrain ribbon   113699

Friday, March 5, 2010

Friendly Inspiration

I'm really into challenges this week.  I love how they inpsire you to do something you may not have thought of doing.  This week over at Stampin' Royalty, they are challenging us with a photo.

We are to use the photo as inpsiration to come up with a card, scrapbook page, or 3-D project.  I chose to do a CAS card  (after I posted this the first time Clean & Simple, put up a challenge using circles).  
Here it is:
I used the blackboard as inspiration for my base.  I then used the white room as inspiration for my background.  The colors are inspired by the flower pots and the image was inspired by the grass.  
At first, I thought this was going to be a difficult challenge. But soon parts of the photo grabbed my attention.  I used these parts as the inspiration.  The best part, was this card took me no more than 10 minutes to make.  Its perfect for thinking of you, thank you, or birthday cards.  I might have to make up a batch.

Thats all for today.  I encourage you to check out the various blogs that feature challenges. You might surprise yourself.

Have a  great day stamping.

Kristy

Supplies:
All supplies used is Stampin' Up unless otherwise noted
  • Basic Black cardstock
  • Whisper White Cardstock
  • Real Red Cardstock
  • Old Olive cardstock
  • Brocade Blue cardstock
  • Dusty Durango cardstock
  • Crushed Curry cardstock
  • 1/4" Very Vanilla grosgrain ribbon
  • Old Olive Classic Stampin' pad
  • Basic Black Classic Stampin' pad
  • Circle Punches:  1/2", 1", 1 3/8"
  • Pocket Silhouettes stamp set

Wednesday, March 3, 2010

Double Double Challenge

Today I decided to tidy up my workspace.  If you know me, that means a big job.  Well I got it done and as a reward I decided to mess it up again.  I mean make a card.  I chose to do two challenges in one card.  It really wasn't that hard as one challenge was  a color combo and the other was a sketch challenge.
The other day I got an order in and I was excited to use all my new toys.  One of the stamp sets that I got was the Animal Stories  (120227).  This stamp set can be earned for free by spending $65 or more on products.  Call me today or visit my website.

The color challenge (from colourQ) was to use Certainly Celery, Baja Breeze (In Color 08), Night of Navy, Sahara Sand, and Whisper White.  This color combo screamed BABY.  And since I had the Animal Stories set I knew exactly what I was going to do.

The sketch challenge was from Diva Coffee Break Designs.  This sketch is super simply and quick.  I literally made this card in 10 minutes.  

Here is the card.
I stamped the whale image with Baja Breeze and kissed it with Night of Navy.  The Kissing technique is a great way to add more dimension to an image. 


Here's how:
  • Stamp you image (solid images work best) in a  light color.
  • Roll the edges of the image in a darker ink.  Do not ink the whole image.
  • Stamp on to paper.
Give it a try.

I used the Scallop circle to punch the image out.  I also used the Diamond Texturz plate to emboss the back layer.  To embellis the card I used Certainly Celery 1/2" ribbon and Whisper White 1/4" Grosgrain ribbon.  The Certainly Celery ribbon was from last years SAB.  Unfortunately its not available any more.

To finish the card off, I had to add a sentiment.  I used the "Small Wonder"  from the Whimsical Words stamp set.  This stamp set you can also get for free during Sale-a-Bration.  Give me a call or visit my website to take advantage of this offer.  

What do you think?  Did I fully complete both challeges?


Enjoy the beautiful Spring Day.

Kristy

Sale-A-Bration Reminder

Just a reminder that Sale-a-Bration ends on March 31.  Take advantage of some of the great products available today.  To see the full brochure click on the catalogue link on the sidebar. 
Three ways to earn these stamp sets:
  1. Spend $65 on any products from current catalogues
  2. Host a workshop totalling $395 or more
  3. Join Stampin' Up and receive 15% off the starter kit.
Visit my website to order or join.


Supplies used today:
  • Night of Navy cardstock 
  • Sahara Sand cardstock
  • Certainly Celery cardstock
  • Baja Breeze cardstock  (discontinued)
  • Whisper White cardstock
  • Scallop Circle punch  (109043   $22.95)
  • Animal Stories  (120227  FREE SAB)
  • Whisper White 1/4" Grosgrain Ribbon  (109025  $7.50)
  • Certainly Celery 1/2" ribbon  (discontinued)
  • Baja Breeze Classic Stampin' Pad  (discontinued)
  • Night of Navy Classic Stampin' Pad  (102977  $7.95)
  • Texturz Plates Stampin' Up! Backgrounds 1  (114512  $15.95)

Tuesday, February 23, 2010

Challenges...

I've been a little busy lately but today I decided I would make a card.  I had 3 different challenges to inspire me, but due to be too busy I didn't make the card in time to submit it to all the challenges.  Anyways here's the card.
The three challenges that inspired this card are: 
  1. Clean & Simple FTL 79
  2. SP Color Combo # 35
  3. Stampin' Royalty Masculine Challenge
The layout is slightly different from the the FTL challenge.  I didn't had the cute ribbon cut on the end of the Glorious Green cardstock.  I thought that was too feminine for this masculine card.  
The colors were a bit of a challenge.  I would never have thought to put these colors together but they work well.  I love the sharp contrast with the black background.  I really like the Only Orange cardstock.  I really need to use it more.
Making the card masculine wasn't too hard.  I just had to find the right stamp and a the Cheers to You stamp set was perfect.  What man doesn't love beer?

If only I had this card done in time to submit it to all the challenges...maybe next time.

I really do enjoy doing challenges.  They make me think.  The best part is I get to try things that I wouldn't necessarily think of on my own.  I really do encourage you to challenge yourself.  

Supplies for Cheers Card
All supplies is Stampin' Up! products unless otherwise stated.
Stamp Sets:
  • Cheers to You (114944)
Paper:
  • Basic Black cardstock
  • Glorious Green cardstock
  • Summer Sun cardstock
  • Only Orange cardstock
  • Whisper White cardstock
Ink:
  • Basic Black Classic Stampin' Pad
Techniques:
  • I cut out the foam part of the image and popped it up using Stampin' Dimensionals.
To order any of the supplies that I used, please  visit my website.
Thanks for stopping by.  I hope you have a great day and remember to challenge yourself.

Kristy

Friday, February 19, 2010

Still Available...

Stampin' Up! has released a list of products from the Holiday Mini Catalogue that are still available to order and will be carried over to the new Idea Book & Catalogue. 

Here are the products:
  • 116821  Stampin' Up! Magnetic Movers & Shapers Holiday Windows      $39.95
  • 116819  Stampin' Up! Bigz XL Table Setting Die   $57.95
  • 116820  Stampin' Up! Embosslits Folder Merry   $15.95
  • 116823  Stampin' Up! Sizzlits Merry Details  $7.50 
  • 116824  Stampin' Up! Textured Impressions Folder Petal-a-Plenty  $10.95 
  • 116822  Stampin' Up! O Christmas Tree Pop-Up  Bigz XL die  $57.95 
  • 118140  Stampin' Up! Tree Decorations Sizzlits Die  $7.50 
  • 116794  Ornament Punch   $22.95 
  • 116806  Shimmer Paint Champagne Frost  $8.95 
  • 116854  Shimmer Paint Frost White  $8.95 
  • 116807  Shimmer Paint Plantinum  $8.95 
  • 116829  Decor Elements Decor Blocks  $13.95 
  • 116519  Charming stamp set  $26.95  
All princes are in Canadian Dollars.

If you would like to purchase any of these great products visit my website.  I also have a few Holiday Mini Catalogues left.  If you would like one, please email me.

Have a wonderful day.

Kristy

Thursday, February 18, 2010

SWAPS...Here they are

Like I mentioned in my last post, the swaps have arrived.  I have decided to post my favorite ones.  As you will notice, the popular set is Vintage Vogue. I will definitely be purchasing that stamp set. 

Before I post the other swaps, I will show you the card that I sent in.
I wanted to make a simple card that demonstrated the Sizzix Big Shot. This card is perfect for birthday, sympathy, or thank you.  And it can be adapted to any color combination and stamp set.  Here is the list of products used:


  • Sahara Sand cardstock
  • Rich Razzleberry cardstock (In Color)
  • Pale Plum cardstock
  • Big Shot Top Note die
  • Pocket Silhouettes stamp set
  • Inspired by Nature stamp set
  • Sahara Sand Classic Stampin' pad
  • Rich Razzleberry Classic Stampin' pad
  • Modern Label punch
  • sponges
This card is super easy and quick.

What you can't see in the picture is that I sponged Sahara Sand around the card base. 


The funny part of this swap was that my mother and I used the same stamp set for our swaps.  We didn't arrange this.  Of course, we received each others swap.  So here is her card.Her card is super easy as well.   

 Here are some of the other SWAPs.  
This card was made by Kristy Taylor.
What I love about this card is the color combo and the sponging technique.  I really love the stamp set.

 
This card was made by Leslie Slanisky.
I love the background on this card.  I like how there are three different different backgrounds and they had different dimensions and textures.

 
This card was made by an anonymous SU demonstrator.  
I love the sharp contrast of the black and white.  


This card was made by Elizabeth Green.
I love the clean lines and the simple layout.  The colors are bold but soft. This card would be perfect for a man.

All the swaps I received were amazing.  I will be using them as inspirations for my next projects.  

This SWAP was open to demos only.  If you would like to particpate in a swap like this, join Stampin' Up! today.  You can do so by contacting me or visiting my website.

Have a great day stamping.  I know I will.

Kristy