Saturday, February 18, 2012

love birds


Posted by PicasaEvery Wednesday I check out Splitcoaststampers for the weekly tutorial.  One week, they showcased the Herringbone tutorial.  This is a great way to use up scraps of patterned paper  or to use up old stock. I decided to grab scraps of old patterned paper.  When this patterned paper came out (from Stampin' Up) I fell in love with it.  Well its been retired for a few years now and I have a lot of it.  

Since its February, I was inspired to make a romantic card, but I didn't want it to be a Valentine's Card.  The colour combination is Basic Gray, Kiwi Kiss, Not Quite Navy, Baha Breeze, and Very Vanilla.  I decided to use the Love Birds from the Olive You stamp set from Stampin' Up!.  The birds are so sweet.  I used Nestabilites Label 18 to cut out the image.  I then sponged the edges.  I wrapped some Kiwi Kiss satin ribbon around the herringbone base and tied a knot, then placed the love birds on top.  To finish it off, I added some Dazzling Details to the stamped image.  Its a perfect card for an anniversary or wedding.  


Thursday, February 16, 2012

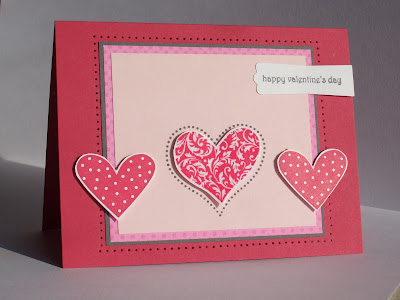
Hearts


Before Valentine's, I was into making Valentine's cards.  Today I have one that I did not give away, maybe next year.  I was just playing around with my stamps and old patterned paper from Stampin' Up!.  I've been challenging myself to use up of retired products.  

The starting point for this card was the piece of patterned Pixie Pink paper that's the middle layer.  You'll have to look really close.  From there, I had to find a color combo that was pleasing to work with.  I stuck with pinks but also used Basic Gray as a neutral for balance.   The complete color combo is Regal Rose, Pixie Pink, Pink Pirouette, and Basic Gray.  I also used a little bit of Very Vanilla.  

The layout was inspired by Clean and Simple FTL 175.  Of course its too late to enter into their challenge, but I still chose to play along.  I used the I {Heart} Hearts stamp set from Stampin' Up! for the card.  I stamped them in Regal Rose and then I covered the large heart with Crystal effects to give it a glossy look.  I really love how that turned out.  

I hope you enjoyed the card.

Tuesday, February 14, 2012

My Valentine's


Happy Valentine's Day!!

What a great day to get back into blogging.  I have been absent for some time now.  I apologize.  Christmas came and took over my life for sometime, and then I've been preparing for our new arrival.  
However, I have been playing in my craft room.  

Today I want to share with you the cards I made for my two Valentines.   
The first card is one I made for my darling husband.  He's been such a great blessing in my life.  And lately he's been helping lots around the house.  I'm unable to do a lot of things, but he's ready and willing to help.  I don't know what I would do without him.  I'm so glad he'll be around for the next nine months.

For the card, I used the Love letterpress plate from Stampin' Up!.  I've played around with it a few times, and I find it works best with watercolour paper.  You get a nicer impression.  I've made it the focal point of the card, as I wanted to let my husband know how much I love him.  I also wanted to make the card masculine, so I used Night of Navy, Ruby Red, and Bravo Burgundy.   I punched the sentiment out with the modern label and placed it on top of some old ribbon I had laying around.  Its colour is really close to Bravo Burgundy.

I sure hope he loves the card.

The second Valentine's in for my 1 year old son.  I was inspired by the train image from the Whoo's Your Valentine stamp set from Stampin' Up!.  The Frosted Window tutorial over at Splitcoaststampers inspired the design of the card.  For the window opening I used the negative of the Spellbinders Nestabilities Labels 18 in Blush Blossom and Regal Rose.  The base of the card is Chocolate Chip.  I placed a layer of Close to Cocoa behind the Frosted Window.   I finished the card with some light pink ribbon that I had laying around and stamped to small hearts (from the stamp set I {Heart} Hearts from Stampin' Up!) in the corners.  It's a perfect card for a child.  

I hope you've enjoyed these cards and I have more to share over the next few weeks.  

Kristy 

Posted by Picasa